
I found this YouTube video extremely helpful when arranging the flowers at the end of this tutorial. It's a little fast but if you pause it along the way you shouldn't have any problems! For some added help, I took some pictures along the way as I pieced together my very first pop-up flower card.
Materials:
-- 7 sheets of paper stock (I used construction paper. The video mentioned above suggests copy paper.)
-- Scissors
-- Marker(s)
-- Glue

1) Fold the sheet of paper in half.

2) Cut along the fold.


4) fold it in half.

5) Fold it in half once more.
* Tip: When moving on to the next step, be sure to work with the CREASED ends (as seen at the bottom of this picture). Using the open ends (as seen at the top left) will end in disaster. It only took me three tries to figure this out!

6) Pull the bottom left up and fold it to match the right side.

7) Flip it over and repeat. This is how it should look before moving on to step 8.

8) Fold again, lining up the edges.

9) Flip it over and repeat.


10) I used a pencil here to mark the outline where you will cut.


11) When you get the edge of the crease, stop....

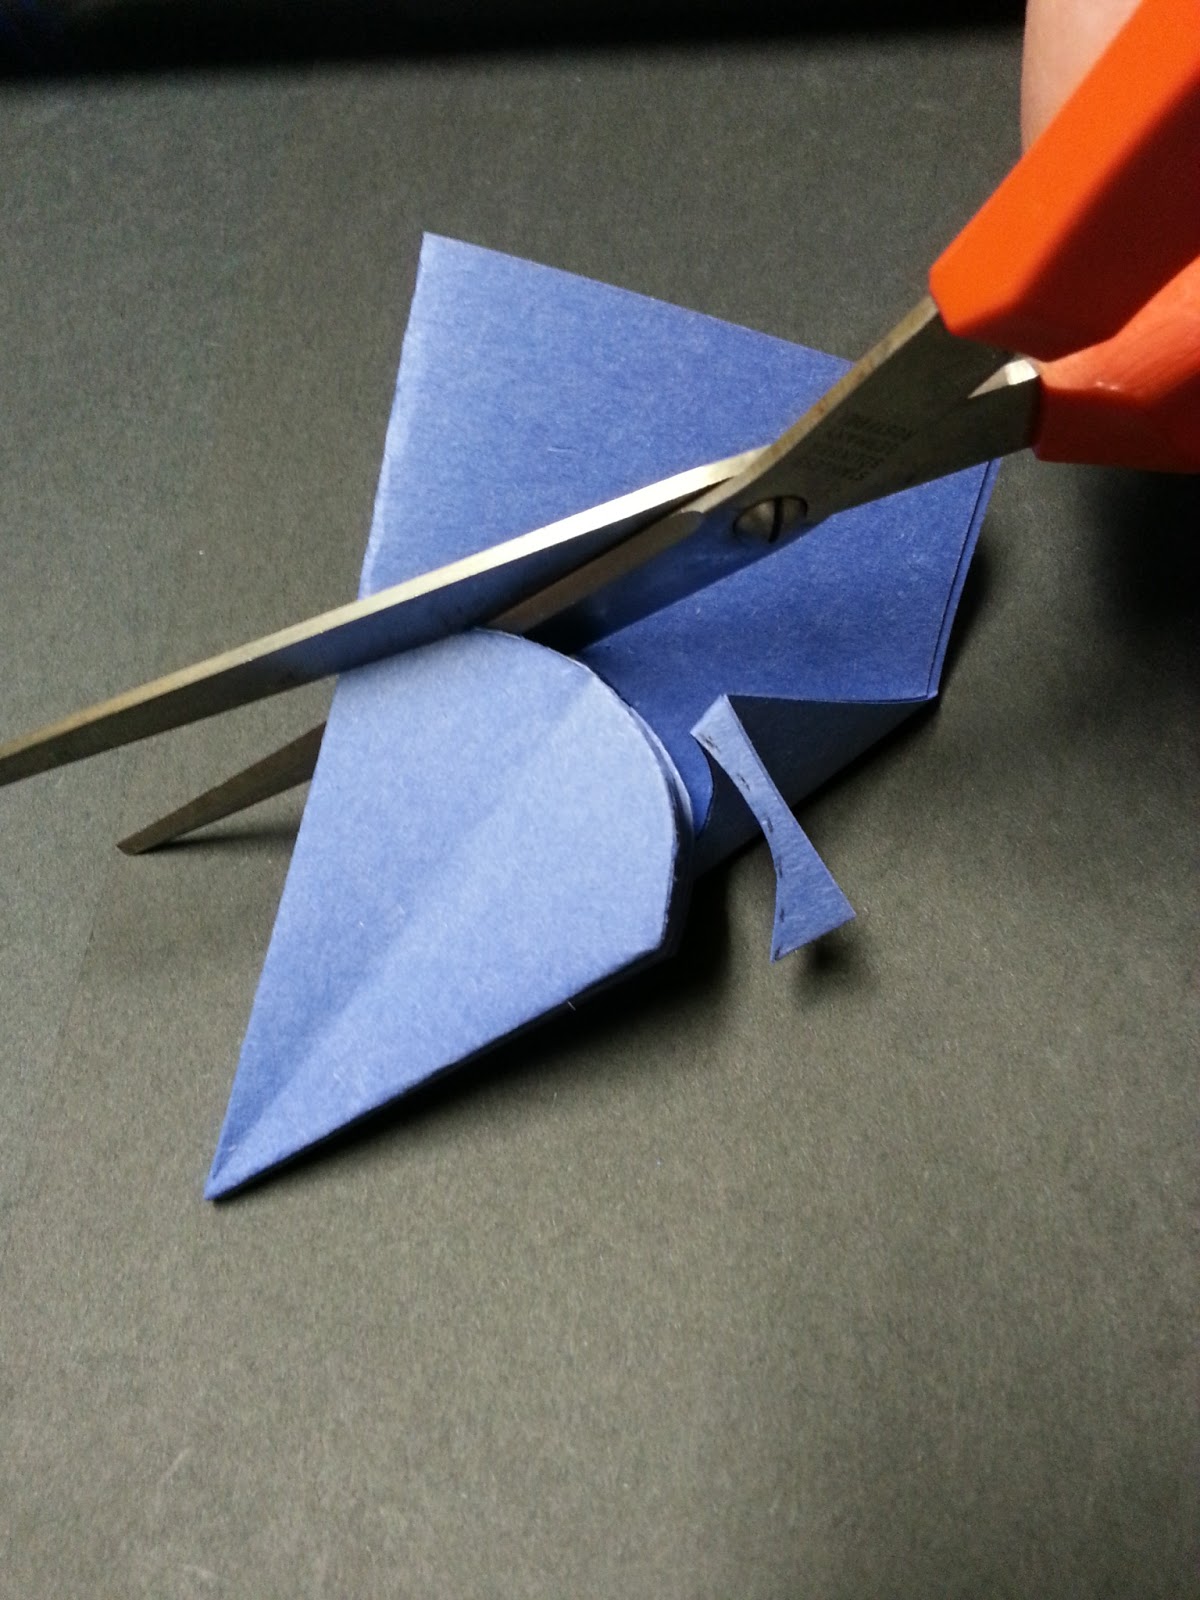

12) Discard the scrap piece (shown at top).

This is how it will look when you open it up. You can also use edging scissors to add a ripple or scalloped edge when cutting out the pedals.
Follow these steps for all 7 half-sheets of paper.


This is the design I chose. You'll see here that I missed one pedal. I didn't realize it until after I took the picture. Two pedals are left blank - you'll see why in the next steps.

13) Cut to the center...


14) Add a dot of glue to the tip of the remaining blank pedal. Some tutorials suggest using glue dots while others recommend liquid glue. For this project, I used Tacky glue.
*Tip: A dot or spec of glue may not seem enough at first but trust me, it works the best. Using too much may not allow the flowers to open up completely when the card opens.

15) Connect the two pedals and set the flower aside.

Follow these steps for the rest of the flowers.

 |
| See that loose end? These are the pedals you've glued together with a spec of glue. This is ok - no need to glue the loose end together because, again, doing so will not allow the flowers to open up completely when you open the finished card. |

 |
| Fold the flowers in half so that you see 3 pedals. I found that placing the loose end face down on your workspace works best. |
 |
| This is how you want to line up your flowers. Note that the GREEN flower shown here is the center flower on the finished piece. I didn't know this before I arranged my colors. Keep this in mind if you're trying to arrange your colors in a certain pattern! |
 |
| Add dots or specs of glue as shown here. |
 |
| Take the blue flower and place in on the right pedal of the red flower. |
 |
| Take the yellow flower and place it on the left pedal of the red flower. |
 |
| Now take the green flower and center it over the red flower. It should cover one pedal green pedal and one yellow pedal. |
 |
| Place the orange pedal on the left pedal of the green flower. |
 |
| Almost there! Now place the pink flower on the right pedal of the green flower. |
 |
| And finally, place the purple flower between the pink and orange flowers, in the same position as the red and green flowers. |
Set the flowers aside to dry. Depending on the glue you use, this can be immediate (if using glue dots) or longer. Tacky glue sets pretty quickly (it did for me) so it should be dry enough once you're ready to start the next steps.
For my project, the card itself is made out of a full sheet of black construction paper. I glued one piece of white copy paper to it (using a glue stick), and then cut out a black circle using edging scissors. Here it is:

 |
| Fold you card in half so it's creased in the center. |
 |
| Place the flower down onto the card as seen here. You want to match up the end of the pedals as close to the center crease as possible,. To do this, I laid the flower down and closed the card, allowing the flower to kind of fall to the middle so it rests in the crease. Open the card slowly so that the flower doesn't move. Place a dot or spec of glue on the tip of the middle of the purple pedal. (The glue is not seen here...I forgot to take the picture!) |
 |
| Once you have the glue on the purple pedal, close the card and press firmly. I've opened it a little here so you can see that it's been glued down. |
 |
| Now open the card so that the glued flower is on the bottom. Place a glue dot or spec of glue on the red flower. |
 |
| Close the card and press firmly. Set aside and let dry. |
 |
| Once dried, you can open it! You may try is slow at first to be sure the glue has dried completely. |
 |
| Opened a little more.... |
 |
| Opened completely! Voila! |
Remember me mentioning that the video suggests to use copy paper? Well, this works good too but I did find that the construction paper (or other thick paper stock) worked better for me. When I tried this project using copy paper, the flowers didn't want to pop up or out when I opened the card. The construction paper flowers, however, popped out and up when I opened the card for the first time! They folded nice and neat, too, when I closed the card.
I hope you've enjoyed this amateur tutorial. There are many other videos and picture tutorials available online that you may find easier to follow and understand. My inspiration was found on Pinterest (as well as the video link I mentioned above) and I'm so glad it was a success!
Happy crafting!


